Showing posts with label Hero Arts. Show all posts

Sunday, August 29, 2010

It's Time for Christmas in August at Paper Sundaes!


Good Morning! I hope you are having a great weekend. I'm working this weekend, but I still have time to share my DT card for Paper Sundaes with you! It's a Christmas theme at Paper Sundaes this week and our sponsor is Simon Says Stamp!

I used this beautiful Hero Arts Hanging Christmas Ornaments image that you can find at Simon Says Stamp...here! I used my copics in the traditional Christmas colors and then made them shine like glass by topping them with Glossy Accents! See the picture below for the effect! Pretty shiny, huh! Then I traced the hangers and bows with a gold gel pen and added a dab of Stickles in Xmas Red to the dots to make them sparkle too. I didn't want the ornaments hanging from thin air, so I added some sparkly sheer organdy ribbon tied into a double loop bow and some rich red velvet ribbon for them to hang from.

I love this sentiment and it's very typical font mixed with a fancy cursive font. The dp and cardstock are all edged in green or red ink. I used a Maya Road trinket pin to add some more sparkle, but I covered the silver bling on top with a dab of Champagne Stickles to keep the gold theme going. Then, I added a little red pearl to finish it off! I really hope you like it! Now go take a look at what the other Design Team members have to share with you at the Paper Sundaes Challenge...I'm sure you will love the eye candy!

Challenges:
Cute Card Thursday #127 - Dieing for a Punch (no punches or dies)
Creative Cottage #21 - Christmas
Totally Gorjuss #45 - Christmas in August

My Crafty Recipe:
Stamps: Hero Arts Hanging Christmas Ornaments, Hampton Art sentiment
Inks: Memento - Tuxedo Black and Bamboo Leaves, StazOn Jet Black, ColorBox Lipstick Red
Paper: Kaiser
Copics: E11, G21, R46, Y32, YG17
Other: Cuttlebug embossing folder (diamonds), Queen & Co. pearls, Maya Road trinket pin, Glossy Accents, gold gel pen, Stickles - xmas red and champagne, sheer red ribbon, red velvet ribbon

Thanks for stopping by and have a great "Sundae"!

Thursday, August 12, 2010

you brighten my day...


Good morning! I have a card to share before I go to work today.

This one is for a few challenges and I just love the fall colors people are starting to choose for color challenges these days (although I'm a pink girl at heart!) So, I decided to play for the first time at Curtain Call. I love Stacy's choices in color combinations and I finally made a card in time! I had so much fun with inking up edges and combining different elements on this one!

I have to leave, so I'll just give you the deets!

Challenges:
Cupcake Inspirations #71 - photo
Curtain Call Act 42 - green, peach, brown, vanilla
Crazy 4 Challenges #49 - cupcake!
Sketch For You to Try - sketch!

My Crafty Recipe:
Stamp: Lockhart floral cupcake, Hero Arts sentiment
Inks: Memento Rich Cocoa and tuxedo black
Paper: MAMBI Fashion District and glitter paper
Spellbinders: Classic Lace Border, Standard Circles Lg.
Copics: E11, E13, E57, G82, R22, YR000, YR02, W3
Other: Fiskars eyelet edge punch, K & Co. bling, pop dots, metal "delight" from stash

Thanks for stopping by!

Wednesday, June 16, 2010

One More Shabby Tea Room DT Call Entry...

Just a quick post tonight ...one more entry for The Shabby Tea Room Design Team Call. I really would be honored to join their Design Team...and I hope they like this shabby little tag I have made!


Supplies:
Stamps: Inky Antics teacup with flowers, Hero Arts Great Flourishes Messages
Inks: Memento Tuxedo Black, Colorbox Chestnut Roan. Craftsmart Brick Red
Papers: Little Yellow Bicycle Christmas Magic Victorian Walls, Anna Griffin
Jenni Bowlin vintage red button, Recollections pearls colored with copic E11, Queen & Co. red pearls, Silk Ribbon

Hugs,

Monday, June 14, 2010

Shabby-liciousness!

Are you ready for some shabby chic?...how about some tea?...even better...shabby tea!

Today I am going to share with you the project and card I made for The Shabby Tea Room's Shabby Little Design Team Call! I am so excited for this chance to be included with so many talented and friendly people. I love their challenges and would honor the opportunity to join their team. Let's start with the inspiration photo...an Antique Red Victorian Tea Pot...


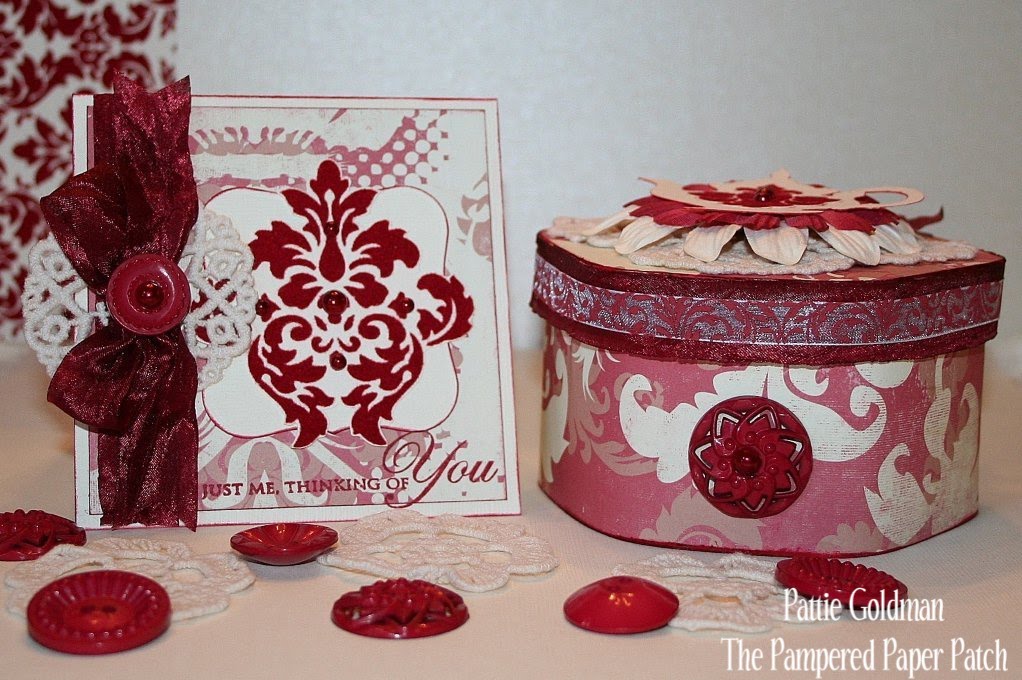
I could not wait to go through my stash of supplies for this one...I knew exactly what paper I wanted to use and you should have seen me in my scraproom...I like to be surrounded by all the items I am thinking about using so they are spread out all over the floor and I can pick up whatever I want within arms reach! So, without further ado, here they are...my shabby little damask tea box and matching card!


I started with a wooden box and applied this lovely red and ivory Kaiser Vagabond Wanderer dp (that's the one paper I knew I had to use!) with Modge Podge to the outside of the box and top of the lid. The entire box is edged in Craftsmart brick red dye ink for that vintage feel. Then came the dark red silk ribbon along the edge of the box lid...sheer ribbon with a red damask pattern lays over that. The box lid is topped with four ivory lace doilies, a Bazzill paper flower, Heidi Swapp red flower and the inspiration of it all...an ivory teapot cut from the stencil I made off the inspiration photo since I don't own a teapot stamp. It's edged in red and adorned with a red velvet damask cutout from a piece of MME Lush red damask paper. A few Queen & Co. pearls make it shine...and finally a touch more ribbon and a Jenni Bowlin red vintage style button on the front of the box gives it the finishing touch! I filled the box with some Bavarian Wild Berry tea...yum!


And now for the matching card. I started with Bazzill french vanilla and added more of the Kaiser damask paper. I cut out a small piece of french vanilla with my Spellbinders labels one and edged it in the same ink as the box. I cut out a larger damask from the MME Lush paper and topped it with more of the red pearls. The sentiment is from the new Hero Arts Great Flourishes Messages stamp set. I love this saying...don't you! Oh my, I can not get enough of this silk ribbon so I tied a little bow, layed atop another lace doilie and finished it off with another Jenni button with a pearl accent.


I really hope you like it...I am so looking forward to seeing the new DT members...I just hope it's me! Thanks for stopping by today!
Hugs,

Sunday, June 13, 2010

you are special...and so are butterflies!

This is my third post today...so scroll down for much more!


I've been busy in my scraproom today...I love having a Sunday off! This afternoon, I am playing for the first time over at Limelight Papercrafts ...using their Sketch #49. I started with a DCWV green card base and I had no idea what I was going to do...then I just started punching with Martha's classic butterflies punch. Before I knew it, my desk was covered in them! I used WRMK Tiffany's dp and several colors of Bazzill cardstock. The sentiment is from the new Hero Arts Great Flourishes Messages stamp set. It is inked with StazOn jet black as well as the edges of all the papers. I also used Martha's deco fans edge punch on the pink cardstock.

Notice how all the butterflies are facing one direction and the only all green one in the middle is facing the other direction...hence, you are special (as is that butterfly)! Some Recollections and K & Co. bling and a few Queen & co. pearls...viola'...my take on the challenge is complete! I really hope you like it...

Wednesday, June 2, 2010

Dream... FTTC 69


It's getting late, but I just wanted to share a mini card I made for The Flourishes Timeless Tuesday Challenge 69. The challenge was to make a one layer card. It's amazing what you can do to one layer to make it shine!

I started by stamping the words in Memento Tuxedo Black ink on my base (not sure of the vendor). On top of that I stamped Hero Arts Scalloped Greenery with embossing ink, covered it in black embossing powder and heated to activate. Viola'...a beautiful reverse image ready to ink. Then came the Ranger Distress inks in Peeled Paint, Dusty Concord and Antique Linen. I was going for a color block effect. I stamped my sentiment...it's up there in the top right corner and garnished with a bit of black velvet, Prima leaf and button with twine center knot!
I hope you like it...

See you tomorrow!